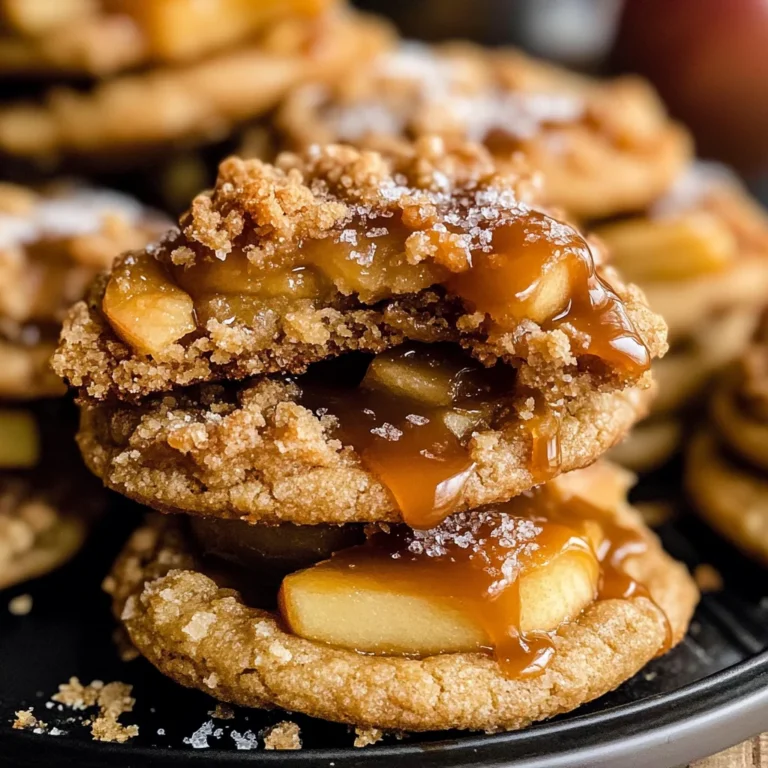
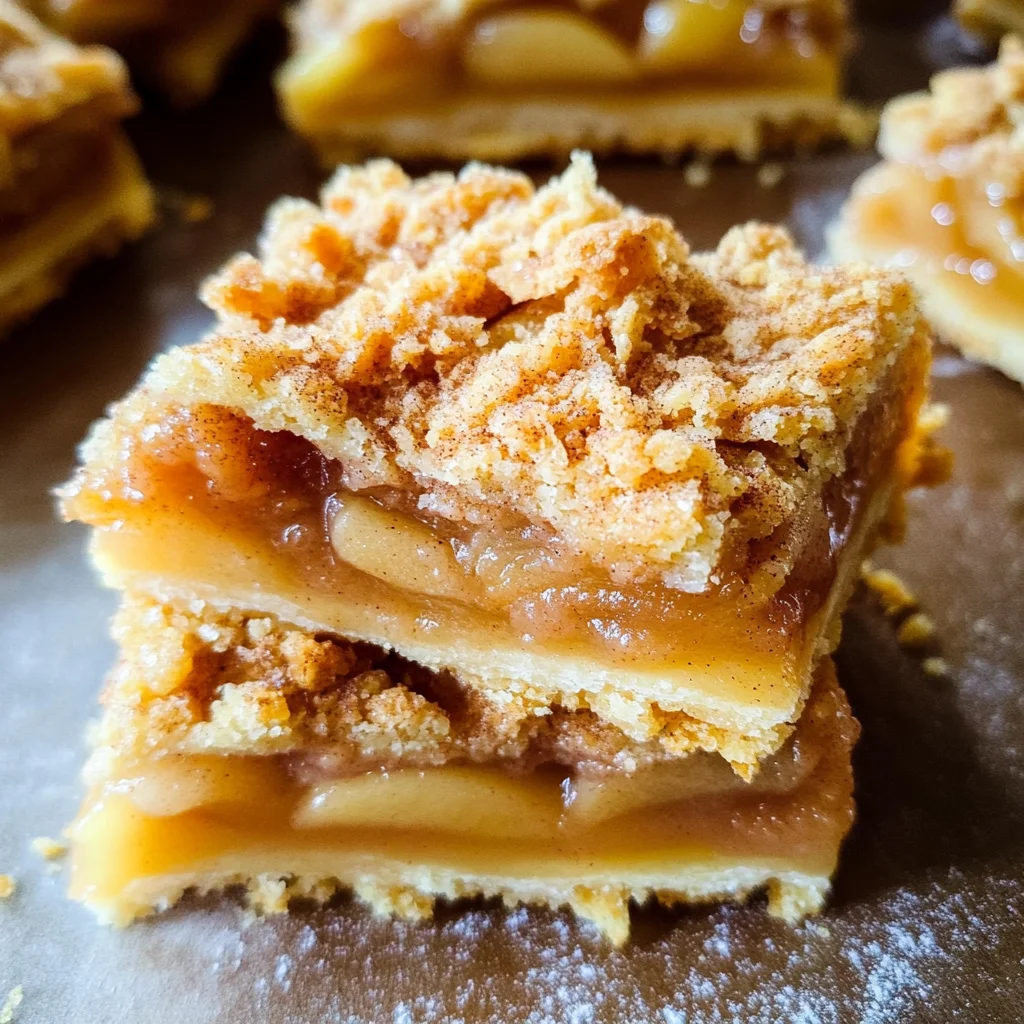
How to Make the Best Apple Pie Bars
If you’re looking for a cozy dessert that brings a smile to everyone’s face, then you’re in the right place! Today, I’m excited to share my favorite recipe on how to make the best apple pie bars. They are like a warm hug from the inside, perfect for busy weeknights or family gatherings. The combination of tender apples and flaky crust makes these bars an absolute treat that everyone will love.
What I adore about these apple pie bars is not just their delicious flavor but also how easy they are to whip up. Whether it’s a casual dinner with friends or a special occasion, this recipe is sure to impress without requiring hours in the kitchen!
Why You’ll Love This Recipe
- Quick preparation: With only 30 minutes of prep time, you can have these sweet treats ready in no time.
- Family-friendly: Everyone loves apple pie, and these bars are no exception! They’re easy to slice and serve.
- Perfect for meal prep: Make them ahead of time and enjoy them throughout the week as a delightful dessert option.
- Deliciously comforting: The warm spices and sweet apples create a flavor that feels like home.
Ingredients You’ll Need
To make these scrumptious apple pie bars, you’ll need some simple and wholesome ingredients that you probably already have in your pantry. Let’s gather what we need!
For the Crust
- 1 cup all-purpose flour
- 1/4 cup granulated sugar
- 1/2 cup unsalted butter, softened
- 1/4 teaspoon salt
For the Filling
- 3 medium apples, peeled and thinly sliced
- 1 tablespoon lemon juice
- 1/2 teaspoon ground cinnamon
- 1/4 teaspoon nutmeg
- 1/4 cup brown sugar
Variations
This recipe is wonderfully flexible! Feel free to get creative and add your twist. Here are some fun ideas:
- Add nuts: Toss in some chopped walnuts or pecans for extra crunch.
- Spice it up: Experiment with different spices like cardamom or ginger for a unique flavor profile.
- Change the fruit: Substitute apples with peaches or pears for a seasonal twist.
- Top it off: Drizzle with caramel sauce or serve with dairy-free ice cream for an indulgent treat.
How to Make How to Make the Best Apple Pie Bars
Step 1: Prepare the Crust
Start by preheating your oven to 350°F (175°C). In a mixing bowl, combine the flour, sugar, butter, and salt. Mix until crumbly but holds together when pressed. This step is crucial because it forms the base of our delicious bars and provides that lovely buttery flavor.
Step 2: Press into Pan
Grease an 8×8-inch baking dish. Take your crust mixture and press it evenly into the bottom of the prepared pan. It’s important to pack it down well so that it creates a solid foundation for our filling.
Step 3: Make the Filling
In another bowl, toss the sliced apples with lemon juice, cinnamon, nutmeg, and brown sugar. Mixing these ingredients helps enhance the natural sweetness of the apples while adding warmth from the spices. Spread this fruity mixture evenly over your crust.
Step 4: Bake
Place your pan in the preheated oven and bake for about 40 minutes until golden brown on top. The aroma wafting through your kitchen will be heavenly! Baking allows all those wonderful flavors to meld together beautifully.
Step 5: Cool and Serve
Once baked, remove from oven and let cool completely before slicing into bars. This cooling step helps everything set nicely so each piece maintains its shape when served. Enjoy every bite of these delightful apple pie bars!
Pro Tips for Making How to Make the Best Apple Pie Bars
Making apple pie bars can be a delightful experience, and with these pro tips, you’ll ensure your dessert turns out perfectly every time.
-
Choose the Right Apples: Opt for a mix of sweet and tart apples, like Granny Smith and Honeycrisp. This combination enhances the flavor complexity and provides a balanced taste that keeps each bite exciting.
-
Chill Your Dough: After making your crust, let it chill in the refrigerator for at least 30 minutes. This helps the butter solidify, resulting in a flakier texture that will melt in your mouth.
-
Don’t Overfill: When layering your apple filling, be mindful not to overstuff. Overfilling can lead to messy bars that won’t hold together nicely when cut, so keep it generous but controlled.
-
Use Parchment Paper: Lining your baking dish with parchment paper makes it easier to lift out the bars once baked. It also helps prevent sticking, ensuring pristine edges and a clean serving experience.
-
Let Them Cool Completely: Allow the apple pie bars to cool completely before cutting into them. This step is crucial for achieving clean slices and preventing them from falling apart.
How to Serve How to Make the Best Apple Pie Bars
Serving apple pie bars can be just as fun as making them! Here are some ideas to present this delicious treat beautifully.
Garnishes
- Whipped Coconut Cream: A dollop of whipped coconut cream adds a light and airy finish that complements the apples’ sweetness without overpowering them.
- Cinnamon Sugar Dusting: Sprinkle a little cinnamon sugar on top for an extra touch of sweetness and spice. It’s a simple way to elevate your presentation.
Side Dishes
- Vanilla Ice Cream: The classic pairing of warm apple pie bars with a scoop of vanilla ice cream creates a comforting contrast between temperatures that everyone loves.
- Fresh Fruit Salad: A refreshing fruit salad balances out the richness of the bars. Use seasonal fruits for a colorful and vibrant addition on the side.
- Caramel Sauce: Drizzling caramel sauce on top or alongside adds an indulgent touch that makes each bite even more heavenly.
- Hot Tea or Coffee: Serving these bars with a warm beverage brings out their cozy charm. Choose herbal tea or coffee for a delightful afternoon treat or dessert option.
Now you’re all set to impress everyone with your homemade apple pie bars! Enjoy every bite!

Make Ahead and Storage
These Apple Pie Bars are perfect for meal prep, allowing you to enjoy a delicious dessert anytime you crave something sweet without the fuss of making it from scratch each time.
Storing Leftovers
- Allow the bars to cool completely before storing.
- Place them in an airtight container to maintain freshness.
- Store at room temperature for up to 3 days or in the refrigerator for up to a week.
Freezing
- Slice the bars and let them cool completely.
- Wrap each slice tightly in plastic wrap, then place them in a freezer-safe bag or container.
- Freeze for up to 3 months. Remember to label your bags with the date!
Reheating
- Thaw frozen bars in the refrigerator overnight.
- For a warm treat, reheat in the oven at 350°F (175°C) for about 10-15 minutes until warmed through.
- Alternatively, use a microwave-safe plate and heat in short intervals until warm.
FAQs
Here are some common questions that might arise when making these delightful Apple Pie Bars.
How to Make the Best Apple Pie Bars without gelatin?
You can make these delicious Apple Pie Bars without gelatin by using cornstarch as a thickening agent. Combine it with your apples and cinnamon to create a luscious filling that holds together beautifully.
What is the best way to serve Apple Pie Bars?
The best way to serve Apple Pie Bars is warm, topped with a scoop of dairy-free ice cream or a dollop of whipped coconut cream. You can also sprinkle some powdered sugar on top for an extra touch!
Can I use different types of apples in my Apple Pie Bars?
Absolutely! Using a mix of sweet and tart apples like Granny Smith and Honeycrisp will create a more complex flavor profile. Feel free to experiment with what you have on hand!
How long does it take to make the best Apple Pie Bars?
This recipe takes about 30 minutes of prep time and 40 minutes of cooking time, totaling around 1 hour and 10 minutes from start to finish. It’s perfect for an afternoon baking session!
Final Thoughts
I hope you find joy in creating these delicious Apple Pie Bars! They’re not only comforting but also versatile enough for any occasion—whether it’s a simple weeknight dessert or a delightful treat for guests. Enjoy every bite, and don’t hesitate to share your creations with family and friends. Happy baking!
How to Make the Best Apple Pie Bars
If you’re in search of a cozy yet impressive dessert, look no further than these delightful apple pie bars. Perfectly spiced with warm cinnamon and featuring tender apples enveloped in a flaky crust, these bars are not just a treat for the taste buds but also incredibly easy to prepare. Whether for a busy weeknight or a family gathering, this recipe will quickly become a favorite. With just 30 minutes of prep time and simple ingredients you likely already have in your pantry, you can whip up this comforting dessert that will surely bring smiles all around.
- Prep Time: 30 minutes
- Cook Time: 40 minutes
- Total Time: 1 hour 10 minutes
- Yield: Makes approximately 9 servings 1x
- Category: Dessert
- Method: Baking
- Cuisine: American
Ingredients
- 1 cup all-purpose flour
- 1/4 cup granulated sugar
- 1/2 cup unsalted butter, softened
- 1/4 teaspoon salt
- 3 medium apples, peeled and thinly sliced
- 1 tablespoon lemon juice
- 1/2 teaspoon ground cinnamon
- 1/4 teaspoon nutmeg
- 1/4 cup brown sugar
Instructions
- Preheat your oven to 350°F (175°C). In a mixing bowl, combine flour, granulated sugar, softened butter, and salt until crumbly.
- Grease an 8×8-inch baking dish and press the crust mixture evenly into the bottom.
- In another bowl, toss sliced apples with lemon juice, cinnamon, nutmeg, and brown sugar. Spread this filling over the crust.
- Bake for about 40 minutes until golden brown on top. Allow to cool completely before slicing into bars.
Nutrition
- Serving Size: 1 serving
- Calories: 200
- Sugar: 12g
- Sodium: 80mg
- Fat: 10g
- Saturated Fat: 6g
- Unsaturated Fat: 4g
- Trans Fat: 0g
- Carbohydrates: 26g
- Fiber: 2g
- Protein: 2g
- Cholesterol: 20mg