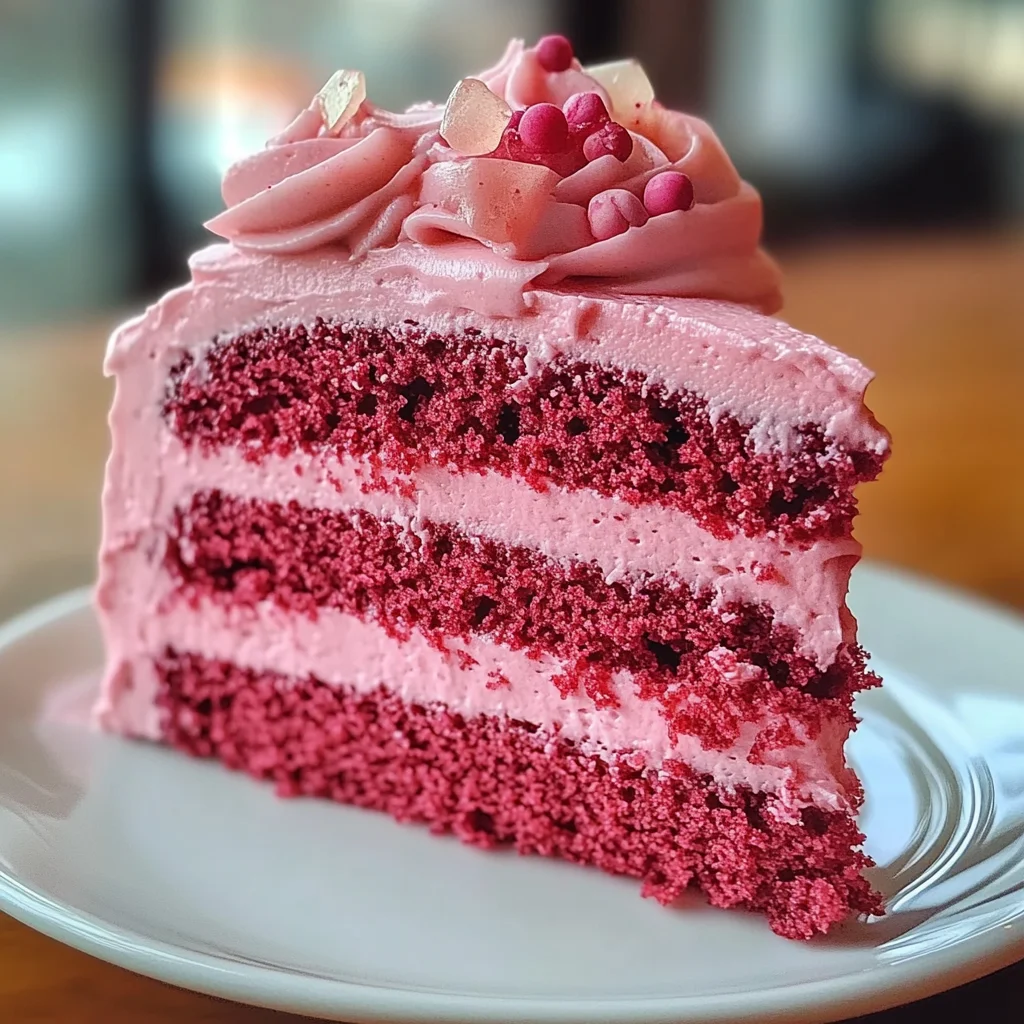
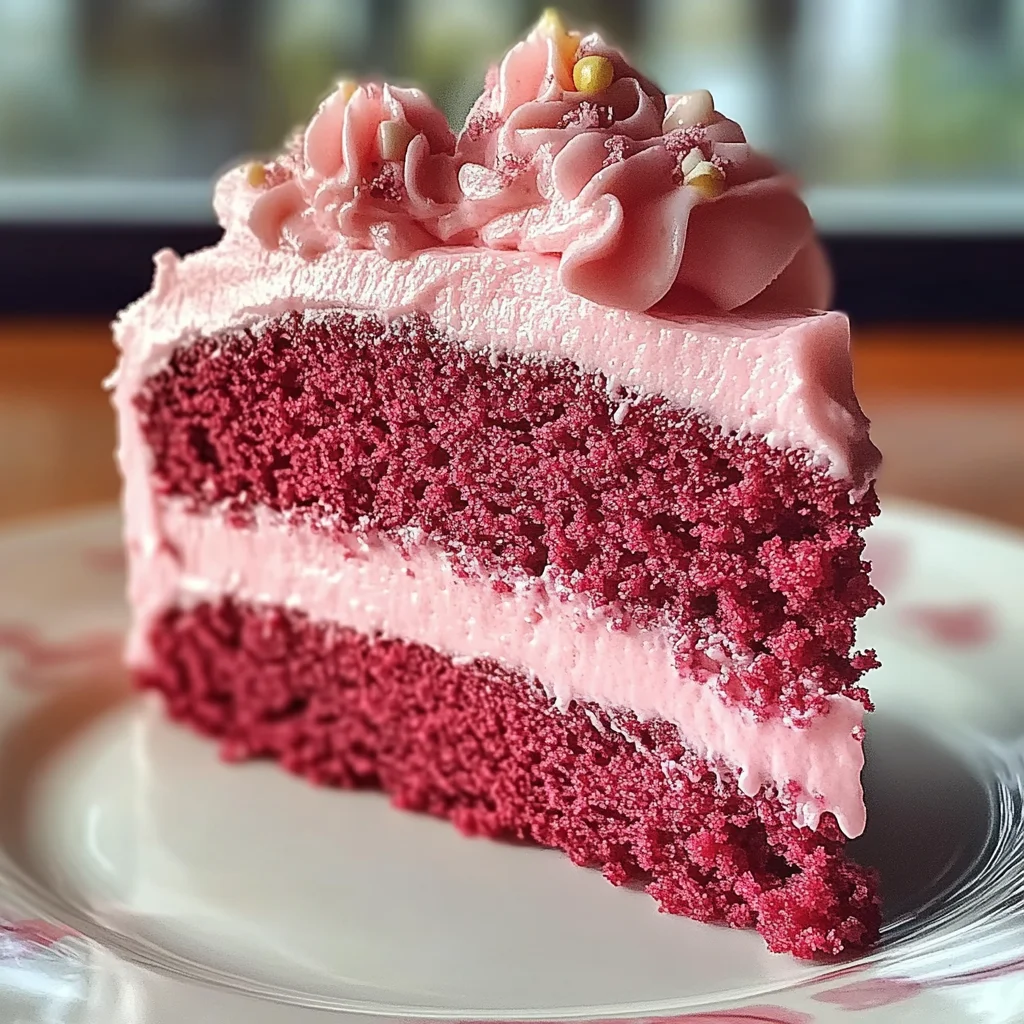
Mother’s Day Pink Velvet Cake
If you’re looking for a showstopper dessert that will make any occasion feel extra special, look no further than this Mother’s Day Pink Velvet Cake. It’s a recipe that holds a special place in my heart—each slice is a celebration of flavors and colors, making it perfect for showing appreciation to the incredible women in our lives. But don’t let the name fool you; this cake isn’t just for Mother’s Day! It’s fantastic for family gatherings, birthday parties, or even those busy weeknights when you crave something sweet and comforting.
What makes this cake truly special is its delightful combination of soft layers infused with cocoa and vanilla. Topped with creamy frosting, it’s not just beautiful but incredibly delicious too. Each bite is a moment of joy that brings back sweet memories!
Why You’ll Love This Recipe
- Easy to Prepare: With straightforward steps, this cake comes together quickly, allowing you to spend more time celebrating.
- Family-Friendly Appeal: The soft texture and sweet flavor are sure to please both kids and adults alike.
- Make-Ahead Convenience: You can bake the layers in advance and frost them when you’re ready to serve.
- Stunning Presentation: The vibrant pink color makes it an eye-catching centerpiece for your table.
Ingredients You’ll Need
Let’s gather some simple, wholesome ingredients to create this delightful cake. You probably have many of these in your pantry already! Here’s what you’ll need:
- 2 ½ cups cake flour
- 1 ¾ cups granulated sugar
- ½ cup unsweetened cocoa powder
- 1 tbsp baking powder
- ½ tsp salt
- ¾ cup unsalted butter, softened
- 4 large eggs (room temperature)
- 1 cup buttermilk
- 2 tsp pure vanilla extract
- Red food coloring (to achieve desired pink hue)
- Cream cheese frosting (for topping)
Variations
This Mother’s Day Pink Velvet Cake is wonderfully flexible! Feel free to get creative with these variation ideas:
- Swap the buttermilk: Use plain yogurt instead for a tangy flavor.
- Add almond extract: A splash of almond extract can give it a delightful nutty twist.
- Top with fresh fruit: Adding strawberries or raspberries on top provides a refreshing contrast.
- Make it gluten-free: Substitute cake flour with a gluten-free blend for those with dietary restrictions.
How to Make Mother’s Day Pink Velvet Cake
Step 1: Preheat the Oven
Start by preheating your oven to 350°F (175°C). Greasing and flouring two 9-inch round cake pans will ensure your cakes come out easily once baked. This step is crucial for achieving that perfect release!
Step 2: Mix Dry Ingredients
In a bowl, whisk together the cake flour, cocoa powder, baking powder, and salt until well combined. This ensures that all dry ingredients are evenly distributed throughout the batter.
Step 3: Cream Butter and Sugar
In another bowl, cream the softened butter and granulated sugar until light and fluffy—about three minutes should do the trick. This process adds air into the mix, making your cake light and airy!
Step 4: Incorporate Eggs
Beat in the eggs one at a time, making sure each one is fully incorporated before adding the next. This step is vital as it helps build structure in your cake.
Step 5: Add Wet Ingredients
Now it’s time to add buttermilk, vanilla extract, and red food coloring into the mix. Stir gently until everything is well combined; this will give your batter that lovely pink hue!
Step 6: Combine Dry Ingredients
Gradually fold in the dry ingredients into the wet mixture until smooth. Be gentle so you don’t deflate all that wonderful air you’ve created.
Step 7: Bake
Divide the batter between your prepared pans and bake for 25-30 minutes or until a toothpick inserted into the center comes out clean. The sweet smell filling your kitchen will be irresistible!
Step 8: Cool Down
Allow cakes to cool in their pans for about ten minutes before transferring them to wire racks. Letting them cool completely ensures they won’t melt your frosting later!
Step 9: Frost Away!
Once cooled, generously frost with cream cheese frosting. The creamy topping adds richness that perfectly complements the moist layers beneath.
And there you have it! A beautiful Mother’s Day Pink Velvet Cake that’s sure to impress everyone at your gathering. Enjoy every bite!
Pro Tips for Making Mother’s Day Pink Velvet Cake
Baking the perfect Pink Velvet Cake is all about attention to detail and a sprinkle of love. Here are some pro tips to help you create a show-stopping dessert that will leave everyone asking for seconds!
-
Use room temperature ingredients: Bringing your eggs and buttermilk to room temperature helps them blend more easily into the batter, creating a smoother texture and better rise.
-
Don’t overmix the batter: Gently folding your dry ingredients into the wet mixture ensures that you maintain the cake’s light and fluffy texture. Overmixing can lead to a dense cake.
-
Check your oven temperature: Ovens can vary in temperature, so it’s always a good idea to use an oven thermometer. This will ensure that your cake bakes evenly and doesn’t turn out dry or undercooked.
-
Cool cakes properly: Allowing your cakes to cool in the pan for just 10 minutes before transferring them to wire racks helps prevent them from breaking apart. This allows them to firm up slightly while still warm.
-
Add flavor variations: Experiment with flavors by substituting buttermilk with yogurt for a tangy twist or adding almond extract for an extra depth of flavor. It’s a fun way to personalize your cake!
How to Serve Mother’s Day Pink Velvet Cake
Presenting your Mother’s Day Pink Velvet Cake beautifully can make all the difference in how it’s received. Here are some delightful ideas on how to serve this stunning dessert.
Garnishes
- Fresh berries: Top each slice with strawberries, raspberries, or blueberries for a burst of color and freshness.
- Mint leaves: A sprig of fresh mint not only adds visual appeal but also a refreshing aroma that complements the sweetness of the cake.
- Edible flowers: Consider decorating your cake or plate with edible flowers like pansies or violets for an elegant touch that screams springtime.
Side Dishes
- Vanilla ice cream: A scoop of creamy vanilla ice cream served alongside the cake adds a delightful contrast in temperature and flavor, enhancing each bite.
- Fruit salad: A light fruit salad made with seasonal fruits provides a refreshing balance against the rich, velvety cake, making it perfect for spring gatherings.
- Coffee or tea: Offering coffee or herbal tea as beverages will elevate your dessert experience, creating a warm and inviting atmosphere.
- Whipped coconut cream: For those who prefer a dairy-free option, whipped coconut cream is light and airy, making it an excellent companion to this rich cake.
With these tips and serving suggestions, you’re all set to impress your loved ones with this fabulous Mother’s Day Pink Velvet Cake! Happy baking!
Make Ahead and Storage
This Mother’s Day Pink Velvet Cake is not only delightful to enjoy on the day of baking, but it also makes for an excellent make-ahead dessert! Preparing this cake in advance allows the flavors to meld beautifully and can save you time on special occasions.
Storing Leftovers
- Keep any leftover cake in an airtight container at room temperature for up to 3 days.
- If you prefer a longer shelf life, refrigerate the cake; it will stay fresh for up to a week.
- To avoid drying out, place a piece of parchment paper over the cut surfaces before sealing.
Freezing
- Wrap each layer of the cooled cake in plastic wrap and then in aluminum foil for best results.
- Freeze for up to 3 months. Be sure to label your packages with the date!
- For frosting, freeze it separately in a sealed container; it can last for about 2 months.
Reheating
- To enjoy a slice warm, microwave it for about 10-15 seconds.
- If frozen, thaw the cake overnight in the refrigerator before reheating.
- For a freshly frosted cake, let it come to room temperature before serving for optimal taste!
FAQs
Here are some common questions you might have about making this delightful cake.
Can I use yogurt instead of buttermilk in the Mother’s Day Pink Velvet Cake?
Absolutely! Yogurt is a fantastic substitute for buttermilk and will add a lovely tanginess to your cake. Just use an equal amount as specified in the recipe.
How can I achieve the perfect pink color for my Mother’s Day Pink Velvet Cake?
To get that beautiful pink hue, start by adding just a few drops of red food coloring to your batter. Mix well and adjust until you reach your desired shade. Remember that baking may slightly lighten the color!
What can I use if I don’t have cream cheese for frosting?
If you don’t have cream cheese on hand, you can create a delicious frosting using whipped cream or mascarpone cheese mixed with powdered sugar and vanilla extract. It will still taste delightful!
How long does this Mother’s Day Pink Velvet Cake last?
When stored properly, this cake can last up to 3 days at room temperature or up to a week when refrigerated. If frozen, it can maintain its quality for up to 3 months!
Can I add fruit toppings to my Mother’s Day Pink Velvet Cake?
Certainly! Fresh fruit like strawberries or raspberries not only adds a refreshing contrast but also enhances its visual appeal. Feel free to get creative with your toppings!
Final Thoughts
Baking this Mother’s Day Pink Velvet Cake is more than just creating a dessert; it’s about crafting sweet memories with those you cherish. Each layer tells a story filled with love and joy that will surely be appreciated by everyone at your gathering. I hope you enjoy making this enchanting treat as much as I do! Happy baking, and here’s to celebrating all the wonderful mothers out there!
Mother’s Day Pink Velvet Cake
Indulge in the delightful experience of baking this Mother’s Day Pink Velvet Cake, a stunning dessert that brings joy to any occasion. With its soft, cocoa-infused layers and creamy frosting, this cake is not only visually appealing but also incredibly delicious. Perfect for family gatherings, birthday celebrations, or simply satisfying a sweet craving on a weeknight, every slice promises to evoke cherished memories.
- Prep Time: 20 minutes
- Cook Time: 30 minutes
- Total Time: 50 minutes
- Yield: Approximately 12 servings 1x
- Category: Dessert
- Method: Baking
- Cuisine: American
Ingredients
- 2 ½ cups cake flour
- 1 ¾ cups granulated sugar
- ½ cup unsweetened cocoa powder
- 1 tbsp baking powder
- ½ tsp salt
- ¾ cup unsalted butter, softened
- 4 large eggs (room temperature)
- 1 cup buttermilk
- 2 tsp pure vanilla extract
- Red food coloring (to achieve desired hue)
- Cream cheese frosting (for topping)
Instructions
- Preheat your oven to 350°F (175°C) and prepare two 9-inch round cake pans by greasing and flouring them.
- In a bowl, whisk together the cake flour, cocoa powder, baking powder, and salt.
- In another bowl, cream the softened butter and granulated sugar until light and fluffy.
- Beat in the eggs one at a time, ensuring each is fully incorporated before adding the next.
- Mix in buttermilk, vanilla extract, and red food coloring until well blended.
- Gradually fold in the dry ingredients until smooth.
- Divide the batter between prepared pans and bake for 25-30 minutes or until a toothpick comes out clean.
- Cool cakes in pans for 10 minutes before transferring to wire racks to cool completely.
- Frost with cream cheese frosting once cooled.
Nutrition
- Serving Size: 1 slice (100g)
- Calories: 360
- Sugar: 34g
- Sodium: 200mg
- Fat: 17g
- Saturated Fat: 10g
- Unsaturated Fat: 6g
- Trans Fat: 0g
- Carbohydrates: 48g
- Fiber: 1g
- Protein: 5g
- Cholesterol: 80mg